

とりあえず、Androidで広告実装してビルド成功して、実機で広告も確認できたから、もう大丈夫だろうと思って、そのままiOSビルドしようとしたら、色々エラーが出て大変なことになってしまいましたが、一応XCodeでビルドして、iPhone端末でプレイできるところまでできたので、メモを残しておきたいと思います。
まずは、開発環境を以下に示します。
【Windows側】
Windows10
Unity2020.3.4f1
【Mac側】
Mac Mini 2020 M1チップ
MacOS Ventura13.1
Xcode Version14.2
【備考】
Windows側でUnityエディターを開き、iOSプラットフォームに切り替えてビルドして、Xcodeプロジェクトを生成。その後、XcodeプロジェクトのデータをMacへ持っていき、Xcodeでビルド。
Androidでビルドできていた状態から、どうやってiOSでもビルドできるようにしたかを記載したいと思います。対策を順番に書いていっても分かりにくいと思うので、自分が効果のあった対策を箇条書きで書きたいと思います。ちなみに、すべての人に当てはまらない可能性もあるので、使えそうな部分だけ採用してみてください!
【Unity側】
1.Google Admobのバージョンは「7.3.0」を使う
https://github.com/googleads/googleads-mobile-unity/releases/tag/v7.3.0
よくわからないが、最新のバージョンを使うと、XCodeでビルドするときにエラーが発生した。自分の場合は「10 duplicate symbols for architecture arm64」というエラーが出ていた。
1-2.External Dependency Managerをインポートする
以下のGithubのURLをそのままダウンロードし、ダウンロードしたデータの中にあるUnityパッケージをインポート。latestのUnityパッケージをインポートした。
ファイル名「external-dependency-manager-latest.unitypackage」
ちなみに、一応この処理をしたが、もしかしたらGoogle AdmobのUnityパッケージをインポートしてしまったら、もう必要ないのかもしれない。
https://github.com/googlesamples/unity-jar-resolver
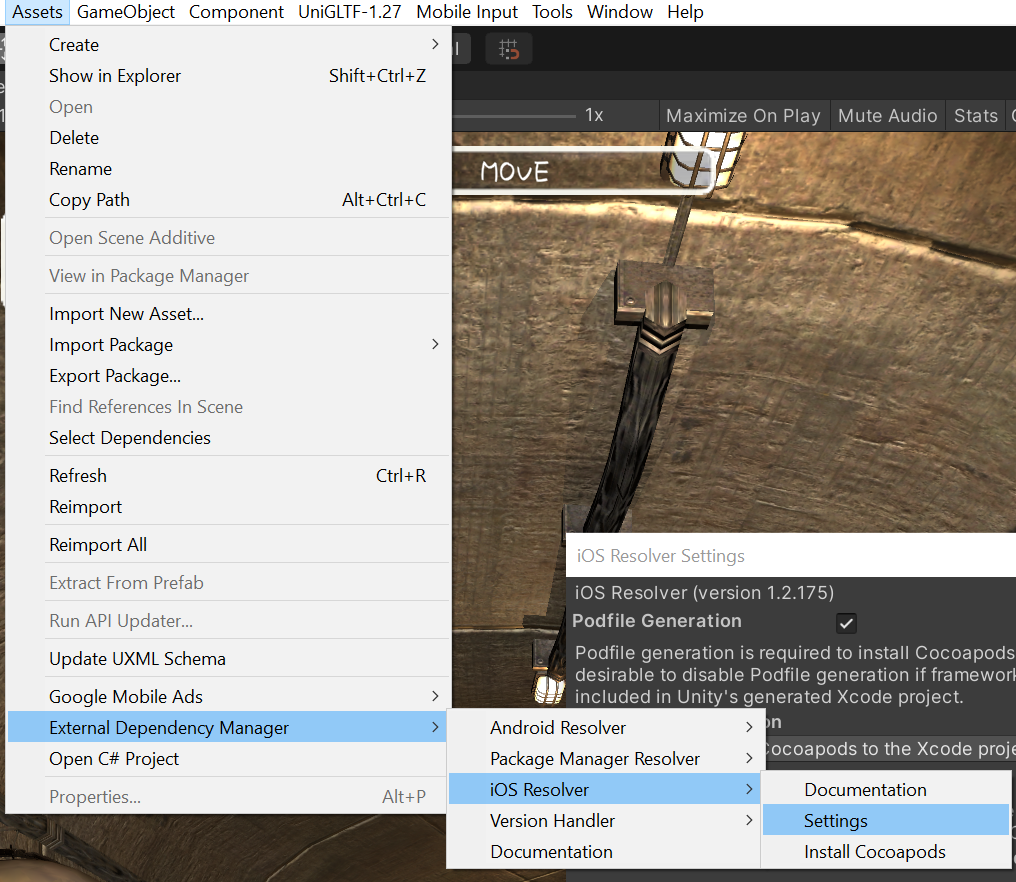
2.iOS Resolver Settingsを開き、Cocoapods Integrationを「Xcode Project – Add Cocoapods to the Xcode project」にする。

<dependencies>

  <!-- Android dependencies are specified under the "androidPackages" element.
       Each "androidPackage" element contains the attributes of an Android
       dependency (e.g AAR, JAR reference). -->
  <androidPackages>
    <!-- Global set of repositories to search for packages.
         These repos will be searched for all packages specified by
         androidPackage. -->
    <repositories>
      <repository>https://repo.maven.apache.org/maven2</repository>
    </repositories>
    <!-- The "spec" attribute is *required* and provides the Maven package
         specification.

         Currently this only supports group:artifact:version_specification where
         group:artifact:version_specification references a Maven package that
         can be located in:
         * Maven central.
         * Google's Maven repo.
         * Local Android SDK Maven repo.

         Additional repositories can be added using the "repositories" element.
    -->
    <androidPackage spec="com.google.android.gms:play-services-games:9.8.0">
      <!-- androidSdkPackageIds is optional and contains the set of Android
           SDK package manager components (packages) this package requires.

           If the package can't be found in any of the specified repositories,
           the dependency resolver will attempt to install the set of Android
           SDK packages specified here and then attempt resolution again.
      -->
      <androidSdkPackageIds>
        <androidSdkPackageId>extra-google-m2repository</androidSdkPackageId>
      </androidSdkPackageIds>
      <!-- "repositories" are optional and contain the set of additional
           repository URIs to search for this package. -->
      <repositories>
        <repository>https://maven.google.com</repository>
      </repositories>
    </androidPackage>
  </androidPackages>

  <!-- iOS Cocoapod dependencies can be specified by each iosPod element. -->
  <iosPods>
    <!-- Global set of sources to search for Cocoapods.
         These sources will be searched for all Cocoapods specified by
         iosPod. -->
<!--    <sources>-->
<!--      <source>https://cocoapods.mycompany.com/Specs</source>-->
<!--    </sources>-->
    <!-- iosPod supports the following attributes:
         * "name" (required)
           Name of the Cocoapod.
         * "path" (optional)
           Path to the local Cocoapod.
           NOTE: This is expanded to a local path when the Podfile is generated.
           For example, if a Unity project has the root path "/my/game" and the
           pod the path is "foo/bar", this will be will be expanded to
           "/my/game/foo/bar" when the Podfile is generated.
         * "version" (optional)
           Cocoapod version specification for the named pod.
           If this is not specified the latest version is used.
           NOTE: This can't be used when "path" is set.
         * "bitcodeEnabled" (optional)
           Whether this Cocoapod requires bitcode to be enabled in Unity's
           generated Xcode project.  This is "true" by default.
         * "minTargetSdk" (optional)
           The minimum iOS SDK required by this Cocoapod.
         * "addToAllTargets" (optional)
           Whether to add this pod to all targets when multiple target is
           supported. This is "false" by default.
         * "configurations" (optional)
           Podfile formatted list of configurations to include this pod in.
         * "modular_headers" (optional)
           Set to true to enable modular headers, false to disable.
         * "source" (optional)
           Source repo to fetch the pod from.
         * "subspecs" (optional)
           Subspecs to include for the pod.
     -->
    <iosPod name="Google-Mobile-Ads-SDK" version="~> 7.0" bitcodeEnabled="false" minTargetSdk="6.0">
      <!-- Set of source URIs to search for this Cocoapod spec.
           By default Cocoapods will attempt to fetch the pod specs from:
           * $HOME/.cocoapods/repos
           * https://github.com/CocoaPods/Specs
           -->
      <sources>
        <source>https://github.com/CocoaPods/Specs</source>
      </sources>
    </iosPod>
  </iosPods>
</dependencies>
# Uncomment the next line to define a global platform for your project
# platform :ios, '9.0'

platform :ios, '11.0'

target 'UnityFramework' do
  pod 'Google-Mobile-Ads-SDK', '~> 9.11'
end
target 'Unity-iPhone' do
end
use_frameworks! :linkage => :static6.Cocoapodsをインストールする。
まずは、HomeBrewをインストールし、HomeBrewからCocoaPodsをインストールする。
https://qiita.com/zaburo/items/29fe23c1ceb6056109fd
https://qiita.com/MachonglishproK/items/c0434a75f8eae556764b
7.MacのターミナルでカレントディレクトリをXcodeプロジェクトへ移動させて、そこで「pod install」を行う。
cd "Xcodeプロジェクトのパス"
pod install8.Xcodeプロジェクトを開くが、ここで開くときに、「〇〇.xcworkspace」ファイルを選択して開く。
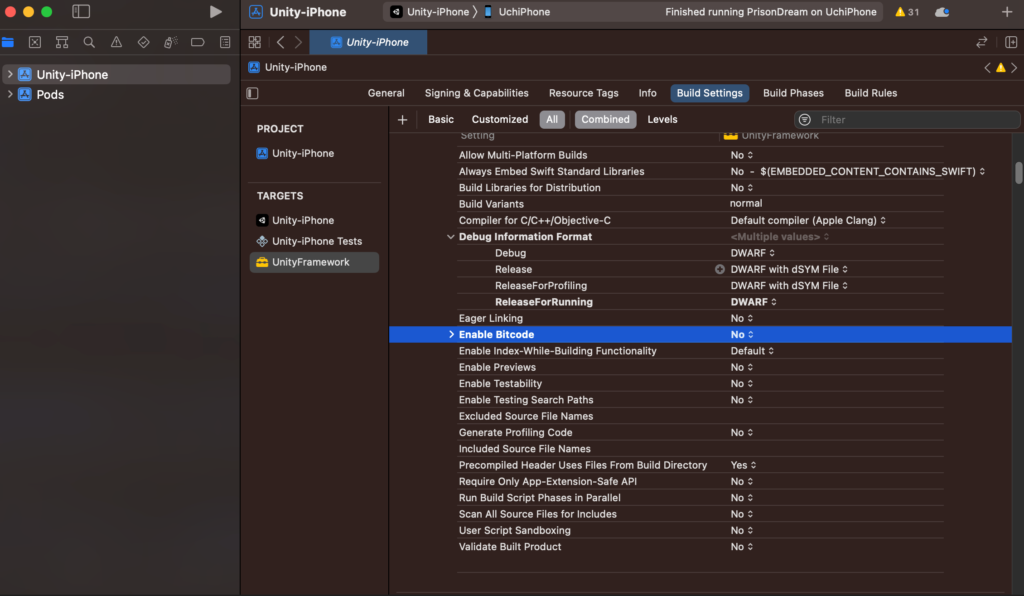
9.Xcodeでプロジェクトを立ち上げ、TARGETS内のUnityFrameworkを選択し、Build Settingsタブをクリックし、「Enable Bitcode」を「No」にする。
しかし、iOSでビルドしたゲームを見ると、広告が表示されていなかった。どうやら、広告はiOSではアプリの承認が得られないと表示されないような仕組みらしい。Androidでビルドしたら広告が表示されていたので、これは問題ないのだと思う。参考URLにあるが、iOSでは広告なしでリリースして、後から広告を実装すればいいようだ。
あと、実機で広告が出なかった場合の別の原因として、単純にスクリプトの書き方がまずかった可能性もある。こちらも参考URLに載せておいたが、広告がロード完了してからイベントハンドラを使って広告を表示するようにしないといけないようだ。
【参考URL】
・Admobに関する情報
https://unitamago.com/2021/12/28/xcode%E3%83%BBunity-admobplug-in-ビルドエラーとcocoapods更新/
https://qiita.com/nekojoker/items/231273c8422a88485b27
https://note.com/hanedask0523/n/n92fe260041ad
・Google AdMobの7.3.0を使うとXCodeでビルドできた
https://groups.google.com/g/google-admob-ads-sdk/c/ojN0apGskQs?pli=1
・iOSのアプリは広告が未リリースアプリだと表示されない?!
https://www.hanachiru-blog.com/entry/2021/02/01/120000
・実機だと広告が出ない場合。取得が完了していない可能性あり
https://note.com/08_14/n/nf68b3985784e
https://qiita.com/skuralll/items/19301b86690282df02bf